Showing posts with label Recipes. Show all posts

Saturday, 14 June 2014

La Parisienne Dijon and Tarragon, Lemon Chicken

La Parisienne Dijon and Tarragon Lemon Chicken


The pictures do not do the chicken justice. This was so nice that my husband complimented me on it! And I didn't take a photo of the reduced gravy made from the juices. It was delicious!

Ingredients:

2 tsp YIAH La Parisienne Dijon and Tarragon Spic Blend
2 tbsp YIAH Mediterranean Olive Oil
4 cloves of garlic, smashed
3 lemons quartered
1 tbsp fresh squeezed lemon juice.
1 kg of chicken pieces.

Method: 

1) Preheat oven to 180C.
2) Mix the olive oil, spice blend and lemon juice in a bowl.
3) Place chicken in an oven dish and cover with olive oil mixture.
4) Throw into tray with chicken, the lemon quarters and smashed garlic clove and season.
5) Serve with mash and vegetables.

Accompanying gravy:


Ingredients: 


Pan juices
 1 1/2 tsp of cornflour.

Method: 


1) Pour pan juices into a small saucepan.
2) Remove 2 tsp of juices to add with the cornflour in a cup. Stir to make a wet paste. If not a wet paste, add a small amount more of the juices.
3) Whisk this paste into the saucepan.
4) Heat gently over a medium heat, continually stirring until the gravy starts to thicken.
5) Serve with chicken and vegetables.


Tuesday, 3 June 2014

I bought a pressure cooker!!!

I spent many of my earlier years scared by all the horror stories I had heard about pressure cookers exploding!! But I must have toughened up a bit in my later years! I have just bought a pressure cooker!! And I am really excited!!

I love Aldi! I always find great items in their sales which I would pay so much more for elsewhere. This is where I picked up my pressure cooker. Always look out for a bargain at Aldi! And no this is not a sponsored post, I just love seeing what awesome things they get in that store.


I still haven't completely worked out how it works, but I am trying it out and I am thinking it could become my best friend. The other night I cooked a roast chicken in 18 minutes, browned it in the oven for a few minutes and voila! roast chicken. So no more panic on nights where I am unprepared, I can now whisk out my new pressure cooker and with my friend google :) , work out how to cook whatever I had planned.

This is why I am posting about this, I am excited! I love to cook and finding new ways to do it. I have never had any experience with pressure cooking and would love some advice or a link to a favourite recipe that you love making in your pressure cooker. So please comment away! And leave any links you may have to great recipes.

Can't wait to see what you guys have discovered before me!

Sunday, 17 June 2012

Pain De Campagne (using sourdough starter)

I have always wanted to make a sourdough style bread and last week I decided the time had come, so I delved out my DK Bread book by Eric Treuille and Ursulla Ferrigno. And following is the recipe I chose to try...

French Country Style Bread with a Sourdough Starter (Pain De Campagne)

Starter:

2 tsp dried yeast
300ml (1/2 pint) water
250g Strong White Flour.

Sprinkle the yeast into the water in a glass jar. Leave for 5 minutes; stir to dissolve. Stir in the flour with a wooden spoon. Cover the jar with a tea towel and leave to ferment at room temp. for a least 2 days but no more than 3 days. Remember to stir mixture twice a day....it will be bubbly and pleasantly sour smelling.

Maintain the Starter:

If remove 250g starter, then need to add 125ml water and 125g flour to the jar.

Dough:

1 tsp dried yeast
175ml water
50g rye flour
325g strong white flour
1 1/2 tsp salt

1) Sprinkle yeast into water. Let stand 5 minutes and then stir to dissolve. Mix flours and salts together and make a well in middle.

2) Spoon 250ml of the starter into flour well and then add yeasted water. Reserve and replenish  remaining starter for your next bread.

3) Mix in flour from the sides to form a stiff but sticky dough. Add water 1 tbsp at a time if mixture is too dry.

4) Turn dough out onto lightly floured surface and knead until smooth and elastic, about 10 minutes.

5) Put dough in clean bowl and cover with tea towel, leave to rise 2 hours. Knock back then leave to rest for 10 minutes.

6)  Shape dough into a round loaf . Place on a floured baking tray. Cover with tea towel and prove until doubled in size 1 1/2 hours.

7) Dust with flour. Cut lines in top of loaf. Bake in preheated oven (220C) for 1 hour until golden brown and hollow sounding. Leave to cool on wired rack.

Thursday, 14 June 2012

Gems hidden in old cookbooks!!!

Today I took out a cookbook that I had found at a second hand book store and had purchased for $5 - The Sun Herald, Australian and New Zealand Complete Book of Cookery, published in 1970 (8 years before I was born :)). I love searching through old cookbooks and trying recipes that have long been forgotten. I love trying out making some of the items we buy ready made, from scratch, like Puff Pastry. This old cookbook will not retire on my bookshelf..there is too much adventure left in it's pages!!

The first recipe I attempted tonight was Caramel Sponge Dessert (baked custard):


3 TBSP sugar (I used rapadura)
2 1/2 TBSP water
568ml milk (I used unhomogenised)
3 eggs
extra 2 TBSP sugar
1 cup soft cake crumbs
Vanilla essence
2/3 cup castor sugar for meringue.

1) Caramelize the 3 TBSP sugar with 1 TBSP water in a saucepan.

2) Add remaining water and boil over medium heat until caramel has dissolved.

3) Add milk and heat.

4) Separate the eggs. Beat yolks with the extra 2 TBSP sugar. Add the hot milk and pour over cake crumbs. Flavour with vanilla essence. Pour into a greased pie dish.

5) Make a meringue with the egg whites and 2/3 cup castor sugar. Place in spoonfuls over the custard.

6) Bake in a moderately slow oven for 40 - 45 minutes. Serve Hot.


Next on my list was a Bakewell Tart:


Pastry:


1 cup plain flour
2 oz butter
1 Dessertspoon castor sugar
1 tsp grated lemon rind
1 egg yolk
2 tsp iced water
1 tsp vanilla essence

1) Rub butter into flour until resembles breadcrumbs.Add sugar and lemon rind.

2) Combine the egg, water and vanilla and then add to the flour. Mix to a smooth dough.

3) Rest in fridge for 30 mins.

4) When ready roll out and lay in a flan dish.


Filling:


2- 3 TBSP jam
2 eggs
3 good TBSP castor sugar
grated rind and juice of 1 lemon
2 oz butter
3 oz ground almonds
3oz fresh cake crumbs

1) Spread jam over base of pastry.

2) Separate the eggs. Beat the yolks with the sugar, lemon rind and juice until creamy.

3) Add melted butter, ground almonds and cake crumbs, beat well.

4) Whisk the egg whites stiffly and fold into mixture lightly.

5) Pour into flan dish and cook in middle of moderate oven for 40 - 50 mins, until set and brown on top.

And finally.....Mother's Gingerbread Pears!!! (Have to report this is the one of the best puddings I have tasted!!)


2 cups plain flour (I used gluten free all purpose flour)
1/4 tsp salt
3 tsp ground ginger
2 tsp baking powder
1/2 tsp bicarbonate of soda
1/2 cup golden syrup or treacle
3 oz butter
2/3 cup brown sugar (rapadura)
1 large egg
1/2 cup milk
extra 1/3 cup brown sugar
2 oz melted butter
1 x 15oz tin pears (I used fresh)

1) Sift 5 ingredients into mixing bowl.

2) Place the treacle, butter and sugar in a saucepan. Stir over low heat until sugar is dissolved. Do not overheat.

3) Cool and stir into dry ingredients.

4) Lastly, mix in the egg and warmed milk.

5) Spread the extra sugar and melted butter in bottom of well-greased lamington tin.

6) Arrange drained pears over the top.

7) Pour over gingerbread batter. Bake moderately slow oven for 50 - 60 minutes.

8) Cut into squares and serve warm with custard.

Hope you enjoy making and tasting these oldies...I sure will!!

Tuesday, 5 June 2012

Looking into my cooking ingredients....Coconut Oil.

As we have been changing our diet, I have been faced with using ingredients that I had not previously heard about. So I am going to share some of the health benefits that I have discovered from researching the products. I will start with:


Coconut Oil...

I have discovered that Coconut Oil is great for your body inside and out!!! It is great for hair, skin, immunity, weight, healing, stress, bones, teeth, kidney and liver, heart,,,etc, etc....!!!

1. Coconut Oil contains vitamins E and K and essential minerals such as iron and magnesium which your bones absorb. Increasing the health of your bones!

2. Coconut Oil stops tooth decay.

3. Helps in the control of blood sugar and improves secretion of insulin.

4. When stressed use it for a gentle head massage and feel your mental fatigue fade away. It is soothing.

5. It is a preventative for liver, kidney and gall bladder diseases. And it helps dissolve kidney stones.

6. It can be used as an insect repellant when mixed with peppermint oil extract.

7. Helps prevent various heart problems including cholestoral and blood pressure.
8. Improves Digestive system, preventing various stomach and digestion problems. The saturated fat (which is not harmful as in vegetable oils) has anti-bacterial properties.

9. Helps in absorption of other nutrients.

10. Helps in taking off excess weight. It is easy to digest and helps in a healthy thyroid. It increases the body metabolism.

11. It strengthens the immune system.

12. When applied to skin infections it forms a protective layer that protects the infected area. It speeds up healing of bruises.

13. It kills viruses. It kills bacteria that causes things like ulcers, throat infections, pneumonia etc..
14. It is great nutrition for your hair. Helps keep hair free of dandruff, lice and lice eggs.

15. It is a great massage oil, moisturiser. Has been found to delay wrinkles and sagging. And it is a treatment for psoriasis, dermatitis and eczema.

I had no idea when I started cooking with this oil, that it had so many benefits! I now use it as a moisturiser and my skin has never been better. My hands which dry out in winter are much better. I have also put some into the bath with the kids and their skin is so soft, and smells so good after their bath!! I am continuing my search on uses for coconut oil as I can see it becoming a very useful item in our home.


Do you use coconut oil??? What for??  Please share as I am very interested in new ways to use it :)


I am including a recipe I just found using Coconut Oil in making home made chocolate!!!


Head to Natural Health Strategies for the procedure....


How to Make Chocolate: The Basic Ingredients
  • 5 tablespoons of virgin coconut oil
  • 5 tablespoons of unsweetened cocoa powder
  • 5 tablespoons of finely grated coconut
  • 1 to 2 tablespoons of sugar (see notes below)
  • 1 pinch of salt
Optional Ingredients
  • If you have natural vanilla extract, a few drops are a wonderful addition.
  • a pinch of powdered cayenne pepper
  • whole, chopped, or ground walnuts, almonds, Brazil nuts, cashews, hazelnuts, sunflower seeds, etc.
  • fresh mint
  • raisins or other chopped dried fruit
Use your imagination to add to this list!
Please note that there is very little that is “hard and fast” in this recipe, and very much that can be varied according to your preference, including the amounts and proportions of the main ingredients. That’s one of its beauties!

Sourced from Natural Health Strategies...link above.

Enjoy!!!

Tuesday, 29 May 2012

Dairy Free English Muffin Recipe...

We are trialling both of my girls on a dairy free diet for this week and so I needed a dairy-free english muffin recipe! So I have adapted a recipe that I pinned earlier in the year... The Fresh Loaf.


Dairy Free English Muffins
1 TBSP Instant Yeast
2 cups Spelt Flour
2 cups Kamut Flour (Wholemeal Khorasan flour)
2 tsp salt
1 egg
1 1/4 cups warm water
2 Tbsp melted coconut oil
Cornmeal for dusting
Combine 2 cups of the flour and the salt in a large bowl. Make a well in the center and pour in egg, water, coconut oil, and yeast . Mix until creamy, about 2 minutes. Add the remaining flour 1/2 cup at a time, stirring in each time, until you have a soft dough that just clears the sides of the bowl.
Turn the dough out onto a floured work surface and knead for 3 to 5 minutes. Return the dough to a clean, greased bowl, cover with plastic wrap, and allow the dough to rise until doubled in size, about 90 minutes.
Sprinkle a work surface with cornmeal. Pour the dough out of the bowl and onto the surface. Sprinkle the top of the dough with cornmeal and then roll the dough into a rectangle about 1/2 inch thick. Use a large round cookie cutter or an upside down drinking glass to cut the muffins out of the dough.
Heat a large skillet over medium heat. Place the muffins onto the skillet and let the bake for 5 to 10 minutes until quite dark before flipping.


These are kid approved!! lol!


Friday, 20 April 2012

Banana brownies

I love this recipe. I made it first time this week using white chocolate instead of dark because that is all I had.

1lb dark chocolate
1 cup butter
4 eggs                                                                            
4 ripe bananas
1 cup flour
1 cup sugar
1 T cocoa
1T baking powder

Preheat oven at 325C.

Melt Chocolate and butter.

Using a separate bowl, mash bananas and add eggs. Add flour, sugar, cocoa and baking powder. Stir to combine.

Pour this banana mixture into the chocolate mixture. Mix.

Butter and flour baking dish. Pour in the batter.

Bake 1 hour and 15 minutes. Test with a toothpick - is it clean?

Brownies are firm.

Sunday, 22 January 2012

Friday Favourite Finds

Here are this weeks picks...

First a bread that made my fussy two year old go mmmm yum, yum!

The Easiest Homemade bread - EVER!!

DSC_2328

Source: Super Healthy Kids on Homeschool Adventures via Pinterest

My next pick is Chocolate, Peanut Butter Cookie Oatmeal


DSC_2700

Source: Super Healthy Kids on Homeschool Adventures via Pinterest

 Next is .......Nutella Toffee Scones


Post image for Nutella Toffee Scones

Source: Tickled Red on Homeschool Adventures via Pinterest

And next it is Vanilla, Nutella Butterball Cookies

 Source: Make and Take on Homeschool Adventures via Pinterest

And lastly we have Stuffed Sweet Potatoes.
Source: Sweet Pea's Kitchen on Homeschool Adventures via Pinterest


Follow other favourite finds at Finding Joy in my Kitchen

Saturday, 14 January 2012

Friday Favourite Finds

I have found some more goodies on Pinterest this week!!! Just take a look at all my Favourite Finds!!


Neapolitan Milk from Big Red Kitchen
Source: Big Red Kitchen via Homeschool Adventures on Pinterest

Hot chocolate icecream with mint choc chips and marshmallows!!! from Tickled Red.
Source: Tickled Red via Homeschool Adeventures on Pinterest
Sticky Chicken in Crockpot by Newlyweds.


Source: Newly weds via Homeschool Adventures on Pinterest

Cake Batter Icecream Bread by In Katrina's Kitchen.
Source: Katrina's Kitchen via Homeschool Adventures on Pinterest

The Easiest Homemade Bread!! by Super Healthy Kids.
Source: Super Healthy Kids via Homeschool adventures on Pinterest.

Fruit filled oatmeal bars by Better Homes and Gardens.

Source: Better Homes and Gardens via Homeschool Adventures on Pinterest


I hope you enjoyed looking through my finds. I have linked this post to Finding Joy in My Kitchen.

Thursday, 12 January 2012

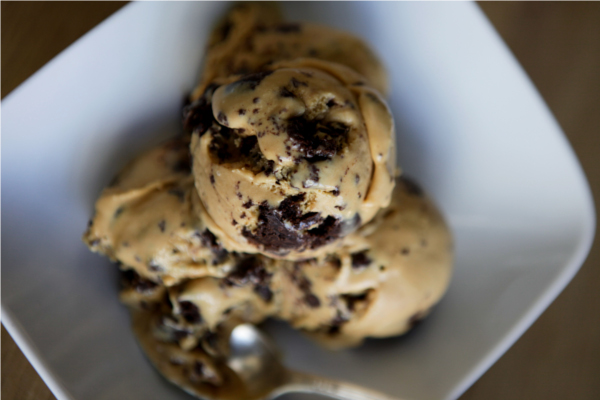
Tempt My Tummy Tuesday!!! Salted Caramel Brown Butter Hazelnut Brownie Chunk Nutella Swirl Ice Cream!!!

I have just recently bought myself an icecream machine and so have been searching the web for delicious recipes. And I found this!! The Salted Caramel Brown Butter Hazelnut brownies chunk nutella swirl icecream!!! This recipe is found at Brave Tart.


When I read this my head went 'WOW!' and my tummy went ' Yum...'!! I can't wait to make this icecream packed with lots of yummy goodness. And I thought this would be a great recipe to tempt your tummy :)!!

You will need some of these recipes to make this glorious icecream (or use your own or store bought - up to you :).

Caramel · GF (about a pint)


12 ounces cream
1 vanilla bean, split and scraped
1½ ounces butter
7 ounces sugar
¼ tsp salt

Bring the cream to a boil with the vanilla bean. Steep for an hour, or as long as you can. If you don’t have that kind of time, use 1 Tbsp of vanilla extract instead.

Caramelize the 7 ounces of sugar by setting a large pot over a medium flame. Sprinkle with some of the sugar to form an even coat over the bottom of the pan. As the sugar melts, sprinkle in a little more. This is a slow process. Shake and swirl the pan to mix, don’t stir. If you notice a hot spot that is caramelizing too fast, sprinkle extra sugar there to “put it out” so to speak. When all the sugar has been added and liquefied, cook until it reaches a foxy brown color.

Immediately pour in a quarter of the cream, and stir. It will bubble and foam and if you didn’t listen to me and used a small pot, you may experience a dangerous overflow, burn your toes, and spend the rest of the day cleaning caramel from your stove. But, if you have a large pot, you’re safe. The mixture will foam up, but not out. Stir, being careful of the steam that’s undoubtedly coming from the pot. The sugar will clump. Worry not.

When the foam subsides, pour in more cream, repeating until it’s all been safely added. Stir and simmer until any clumped up sugar has dissolved. Then stir in the butter, salt, and vanilla bean scrapings.

You can strain the mixture if you like, to sieve out any bits that may have not dissolved. I like to leave the vanilla bean in until just before serving, so it continues to infuse the caramel.

And another recipe...
Brown Butter Hazelnut Brownies
Dress the brownies up or down by baking them in either a 9“x13” pan and cutting into simple squares, or bake them in 4” round tart pans. Even as a super casual square, these brownies have a seriously elegant flavor.

16 ounces unsalted butter
12 ounces dark chocolate (70% minimum) chopped
1 vanilla bean, split and scraped, seeds reserved or 2 Tbsp vanilla extract
7 ounces toasted hazelnuts, skins removed
4.5 ounces cocoa powder (not Hershey’s. I’m serious.)
6 eggs
21 ounces sugar
1 tsp salt
1 Tbsp instant espresso powder

optional: additional chocolate for drizzling or dipping

Preheat the oven to 325°.

Line a 9“x13” metal baking pan with a sheet of aluminum foil; one long strip down the middle and hanging over the ends will get the job done. This will make removing the brownies super easy, and cleaning up a little less onerous. Alternately, lightly greases 15, 4” round tart pans.

What to do: melt the butter, along with the vanilla bean, in a medium saucepan over low heat until liquefied. (If you’re using vanilla extract, don’t add it now. Add it in later, with the salt and espresso.)

Crank up the heat to medium low. The mixture will bubble, possibly spit, and make a lot of noise. Keep an eye on it, and keep simmering. You’ll notice brown bits forming on the bottom, you don’t want these bits to turn black*. Don’t bother with stirring or skimming, just watch and listen and possibly turn down the heat if it looks too toasty. After a while, the butter will really go ninja silent, which means you’re done.

Now remove from/shut off the heat and add in the chocolate. Whisk, scraping along the bottom to mix up the browned bits, until smooth. The mixture will be quite thin. Set off the heat to cool.

Put the hazelnuts and cocoa in the bowl of a food processor and pulse until finely ground. Don’t bother sifting, the nibby bits of hazelnut are really nice in the finished brownie. Set aside.

With a hand mixer or stand mixer fitted with a whisk attachment, combine the eggs, sugar, reserved vanilla seeds (or vanilla extract if you’re going that route), salt, and espresso powder. Whip on medium speed for about 5 minutes.

Turn down the speed on the stand mixer to low and pour in the butter/chocolate mixture all at once. Immediately add in the dry ingredients and keep mixing until just incorporated.

Pour or spoon into the prepared pan or pans. Bake about 30 minutes for the large pan, and closer to 15 for the 4” rounds. Bake until just slightly firm to the touch. They may not seem totally done when you pull them out, but this particular brownie is so very dense that it will retain its heat and keep cooking for quite some time. Err on the side of gooey.

Cool the brownies thoroughly before cutting or removing from the pans.

In the case of the 9“x13” pan, lift the brownies out of the pan by tugging on the foil. If you’re looking to get extremely neat squares, refrigerate the brownies for an hour before cutting.

In the case of the 4” rounds, wedge a toothpick between the brownie and the pan, wiggle to loosen the brownie, then flip the pan over and rap firmly against the counter. It should pop right out, but if you have trouble, keep toothpicking around the edges until the brownie comes out.

In either case, drizzle or cover in tempered chocolate if you like, or serve them as-is.

*If you were to accidentally blacken your butter, you can still save the day! Instead of mixing the chocolate into the butter, strain the butter into the chocolate, so as not to incorporate any of the burned bits. The butter will have a pronounced toasty flavor, but it is actually quite yummy. I’ve saved a batch or two with this method, so fear not.

And then homemade Nutella if you want...


7 ounces water
15 ounces sugar
6 ounces corn syrup or honey
3 ounces butter (you may omit the butter for vegan/lactose free)
1 vanilla bean, split and scraped, bean minced (directions below)
10 ounces hazelnuts, toasted, skinned, and roughly chopped

8 ounces dark chocolate (preferably not from chips), melted & cooled
1 ounce cocoa powder
3/4 tsp salt
6 to 8 ounces hazelnut oil

Lightly grease a sheet pan with butter and set aside.

To prepare the vanilla bean, split it in half and scrape; add the bean paste into the sugar. Now, cut the bean halves in half, lengthwise. Now mince these four strips as finely as you can. Rub your vanilla coated fingers in the sugar to “clean” your fingertips without wasting the vanilla

Combine the water, sugar and vanilla bean paste, corn syrup, butter, and minced vanilla bean in a sauce pot. Turn the heat to medium and stir gently while heating to dissolve the sugar. Once the mixture starts to boil, stop stirring and let it carry on, undisturbed.

Cook until the mixture has a pale golden color, about 300° on a candy thermometer. This temperature yields the most authentic “Nutella” flavor. If you’d like a more pronounced caramel flavor, let the mixture darken to a foxy amber. But, as I said, 300° is perfect.

Shut off the heat, add in the toasted hazelnuts and stir thoroughly. Pour the mixture onto the sheet pan and spread it out with your spatula. Compared to the average batch of nut-brittle, there are a lot of nuts and not so much brittle. So the mixture will seem quite thick, but that is quite fine.

When the brittle has cooled completely, chop it roughly with a knife to make it a little more manageable for your food processor. Take care if you break it up with your hands. I’ve actually cut myself pretty badly before with a sharp piece of brittle. (Brutal brittle!)

Put about half the brittle in the food processor and begin pulsing to chop it into smaller bits. Add the rest of the brittle in, pulsing the blade all the while, and then just let the processor run until it begins to form a paste.

Shut off the processor, pour in all of the cooled chocolate, cocoa, and salt. Replace the lid and continue to run until the mixture is homogeneous. Then, with the mixer still running, slowly drizzle in the oil. Use the full 8 ounces if you would like a thinner texture, use less for a thicker, more traditional spread.

If you’re anything like me, you will immediately begin dipping any available food stuffs into the mixture, baguette being the first and best option. Bananas second. Followed by pretty much anything. Once you’ve had your fill, transfer the mixture to jars. You’ll have about 5 cups, depending on how hard you snacked first.

When it’s fresh off the food processor, the mixture will be disturbingly liquidy. But it will set up to smooth, creamy, Nutella-like texture as the chocolate cools. If your kitchen is quite cold, it will set up much faster. I made this at work where it is about 60° and it set up fast. Whenever I make it at home (a balmy 72°) it can take several hours.

Store at room temperature, for up to two weeks. Refrigerate or freeze indefinitely. Just take care not to microwave the mixture if you are thawing it out, the heat will cause the crystallized sugar to melt out, destroying the additively crunchy texture of the paste.

And at last the ICECREAM recipe!


20 ounces (1 batch) caramel, still warm

3 ounces milk
3 ounces cream
1/2 vanilla bean, split and scraped
2 ounces egg yolks
2 ounces sugar
1/4 tsp kosher salt, or more to taste

6 ounces brown butter hazelnut brownie chunks
2 ounces "Nutella"

In a small pot, bring the milk and cream to a simmer with the vanilla bean pod. When the mixture begins to bubble, shut off the heat and cover with a lid. Steep for one hour.

If you haven’t already made the caramel, this would be the perfect time. Either way, once you’ve got it, put the caramel in a medium bowl and place a sieve over it. Set aside until later.

When the dairy has finished steeping, return it to a simmer. Whisk together the yolks, sugar and salt in a small bowl.

Once the dairy begins to simmer, fish out the vanilla bean and use a spatula to scrape out all of the heavily flavored cream from inside the pod. That stuff is liquid gold, make sure not to lose a drop. It’s easier to scrape out the vanilla pod while it’s still warm (hence bringing the mix to a simmer) because when cold, the vanilla-goo congeals and sticks more resolutely to the bean.

Now, whisk some of the hot dairy mixture into the egg yolks, one ladle-full at a time, until the egg mixture is quite warm. Then whisk the egg mixture into the pot of cream and turn the heat to medium low. Stir constantly, making sure to scrape all along the bottom of the pot while to avoid allowing any of the mixture to curdle.

Continue cooking and stirring until the ice cream base thickens markedly (“coating the back of a wooden spoon” being the popular description of done-ness).

Immediately shut off the heat and strain the custard through a sieve and into the bowl of caramel. Whisk them together until thoroughly combined.

Give the base a taste and see if you’d like to add more salt. I call for a 1/4 tsp of salt, but really, that’s just a starting point; some people like their “salty caramel” really salty and others like just a hint. Just bear in mind the ice cream will be paired with brownie chunks and "Nutella", so salt plays an important roll in offsetting all that sugar.

Cool in an ice bath and refrigerate overnight. Process in an ice cream maker according to manufacturer’s directions. In my experience, this ice cream can take much longer to freeze than other ice creams. Don’t be alarmed, it will churn up eventually, just give it some extra time.

While the ice cream is churning, toss the brownie chunks with the "Nutella" in a medium bowl, until evenly coated. The measurements given are rough; you may find you want more chunks or more "Nutella." Use your judgement; remember more is more.

When the ice cream has finished churning, fold in the "Nutella" coated brownie chunks, transfer to a container and freeze.

I hope that you enjoy.....I know I will...yum, yum!

Friday, 6 January 2012

Friday Favourite Finds

Well here we go Friday Favourite Finds. After two weeks on Pinterest I have found many wonderful things :)and here are a few..

My first pick is from Sandy Toes & Popsicles And it looks so, so much fun!!!:

CANDY BUTTONS


My second pick is from Betty Crocker. I love dessert pizzas and this one looks divine!!

BROWNIE AND BERRIES DESSERT PIZZA


My next pick is from Fast Meals from the Pantry. I think the kids will love these :)

OVEN FRIED PARMESAN CHICKEN STRIPS


My next pick is for the kids. I am always trying to make the food fun :)This pick is from Kitchen Fun with my Three Sons

A GRILLED CHEESE ICECREAM LUNCH


My next pickis for all those making their own yoghurt. It is from The Highland View Pantry.


STRAWBERRY OR CHERRY HOMEMADE YOGHURT


I have been searching and searching for some new breakfast recipes. This is one that I have found, from QUICK DISH.

FRENCH TOAST KEBABS


And another breakfast recipe from Bacon Today.

BACON PANCAKES


And one more breakfast recipe from A'la Mode.

BANANA, STRAWBERRY OATMEAL BRULEE


I hope you enjoy my Friday favourite finds being hosted by Finding Joy in my Kitchen.

Sunday, 1 January 2012

Weekly Menu Plan 31st December 2011 to 5th January 2012

This week I have decided to get the kids to help with the meal plan. I scrunched up bits of paper with the meals written on them. Each of the kids picked a paper and they became responsible for planning a weeks menu and helping to cook it.

And this week I am starting to link up with 'I'm an organising Junkie'


This is how the week looked:

Mum: Breakfast and snack

Damon: Lunch

Adele: Dinner

Avril: Dessert

Here is how our week has looks:

Saturday:

Breakfast:
Strawberry Almond Granola and English muffins


Snack: Malteser Cookies

Lunch: Honey Banana Wholewheat toast and yoghurt


Snack:
Fruit

Dinner: Sweet hot drumsticks with honey roasted potatoes

Sunday

Breakfast: Egg Sandwich with baby spinach, brie and maple bacon (all upon homemade english muffins :) )


Snack: Fruit

Lunch: Roast turkey, roast vegies, yorkshire pudding and gravy.

Dessert: S'mores cobbler with homemade malteser icecream.


Snack: Fruit

Dinner: Rice Bubbles and Yoghurt Pops


Monday:

Breakfast: strawberry granola, Honey and vanilla homemade yoghurt and maple syrup.

Snack: Fruit

Lunch: Cinnamon Swirl Raisin Bread

Snack: Malteser Cookies and milk

Dinner: Hot Dog Spaghetti


Tuesday:

Breakfast: Banana Coconut oatmeal

Snack:
Honey and vanilla yoghurt

Lunch: Scrambled egg wrap

Snack: Cinnamon Swirl raisin toast

Dinner: Garlicky baked fries and home made chicken nuggets

Wednesday:

Breakfast: Strawberry Granola and yoghurt with maple syrup

Snack: Fruit

Lunch: Animal shaped roll sandwiches


Snack: Yoghurt and fruit

Dinner: Bubble Up Pizza and salad

Thursday:

Breakfast: Home made Pop tarts


Snack: Fruit and yoghurt

Lunch: Animal Shaped roll sandwiches

Snack: Rice crackers and fruit

Dinner: Crispy Honey Garlic Wings and home made tater tots

Friday:

Breakfast: Scrambled eggs on toast

Snack: Fruit

Lunch Icecream Bread

Snack: Yoghurt

Dinner: Cheese stuffed meatballs and spaghetti